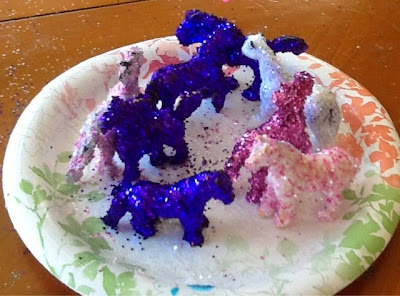
These two SWAPs are some of our favorites. My seven year-old used both of these at her "Myths and Legends" camp. She had two different SWAPs because a) I had SWAP fever at this point, b) the first one was too expensive to make more than 24, and c) my daughter gets bored after a dozen of anything. The second SWAP was inspired by her unit name "Thumbelina" and made entirely out of supplies I already had in the house, whereas the first we had conceived weeks earlier in a binge while the two of us walked through Micheals Craft Store.
Pegasus SWAP
This was inspired by the camp theme "Myths and Legends" and some glittered Christmas deer I found on the pinterest. My daughter jumped on the idea with enthusiasm and her attention span lasted longer with these SWAPs than any other we've made. And why wouldn't they? Glue, paint, glitter, hot glue and feathers. A little girls dream. Depending on how cheap you find the horses and the glitter it can be on the pricier side, which is why we only made 24, but they are pretty cool.
 |
Supplies
1. Small plastic hobby horses (the ones I got were 12 for $10 at Michael's, 40% off with coupon).
2. Elmer's type glue
3. Tempera paint and paint brushes
4. Glitter
5. Small decorative feathers
6. Glue gun
7. Paper plates
 |
| Starting supplies |
Steps:
1. Mix equal parts glue and tempera paint.
 |
 |
2. Paint to fully cover toy horse.
 |
3. Sprinkle on glitter thickly. I Recommend lying it in the glitter once you've got a nice pile and really coating it with glitter.
 |
4. Let dry several hours or overnight.
 |
5. Find pairs of tiny feathers, trim as needed.
 |
6. Hot glue feathers on with a low heat gun.
 |
 |
Yes, that's my 7 year-old with the glue gun. She is excellent with it and really enjoys using it. I definitely think girls this age can use them safely. They just need to be closely supervised the first few times. (And only use low-heat guns. Seriously, throw out the old ones, they can be dangerous.)
 |
| Finished Pegasus' |
We printed out these simple tags. I learned this clever folding technique from the Aids in my last camp.
 |
| Tag |
9. Then I tied a thin ribbon around the horses neck and secured it with hot glue before my daughter pinned on the tag. I tried pinning it straight to the wings but it didn't work. I used old ribbon that is around the house, but the really thin ones work best.
 |
 |
Thumbelina SWAP
We found out my daughters unit name for "Myths and Legends" Camp was "Thumbelina" after we made the Pegasus'. Since the pegasuses were so expensive and you can easily swap 50 SWAPs at this camp we decided to make a Thumbelina one as well.
After doing this I fully recommend making two different SWAPs, much better for the attention span. 50 of the same thing is a lot. For this SWAP we used only things we already had in the house (though I was very tempted to go out and buy wooden beads for the head). It helped defray the costs of the horses.
Supplies
1. Pipe-cleaners (flesh colored optional)
2. Cheap fake flowers, deconstructed
3. Pony beads
4. Yarn
5. Hot glue gun
6. Safety pins
7. Tags
Steps
1. Cut the pipe-cleaner to twice the length of your thumb and fold it in half.
 |
2. Thread on bead and twist 3 times.


No comments:
Post a Comment