This may have been my favorite field trip from that first year. Looking back, it was very likely completely unnecessary. We didn't earn another Petal and while it reinforced a bunch of things from the Journey it wasn't needed in our already busy schedule. That being said it was awesome and I'm so glad we went. The grounds at Green Spring Gardens are beautiful. The day was gorgeous and the tour guide spectacular.
We only had about half our girls show up (there were a few last minute emergencies) but the girls that went had a great time. We also created a worm composting bin and the worms are still, miraculously, alive in my garage.
Green Springs Gardens Field Trip
Early May
 |
| Green Spring Garden Horticulture Center |
Goals and Badges:
As I said, this wasn't a field trip that we needed for anything. Technically, it would have been part of their Bumble Bee patch for the Garden Journey, but they had already earned that. We did read the 5th chapter from the Journey Book. It also fed into our last two petals, "Use Resources Wisely" and "Make the World a Better Place" as well.
*******
10:30am Drop off/gathering
10:45 Drive to Green Spring Garden
11:30 Arrive
11:45 Lunch and read from Journey Book
12:30 Tour/activity
2:00 Pack up to head home
3:00 Arrive back at my house
*******
 |
| Hand Out for this field trip |
Email about Field Trip:
The Sunday May 5 Trip to Spring Gardens
Like the last field trip please bring/remember:
- Be in full Daisy uniform
- Wear sneakers, we’ll be out in the grounds
- Bring/wear a light coat or jacket, we’ll be outside a lot
- Bring a packed lunch for before the tour.
- Bring a water bottle instead of a drink box or pouch, big enough to last the whole trip. It can have any drink, doesn't have to be water.
- Give them breakfast before, lunch will be between 12 and 12:30.
- Bring a backpack to keep your lunch and jacket in. The girls are responsible for carrying their own stuff. The chaperones will no longer carry bags and jackets!
K____ will send out a message with the permission slip attached. Try to have it for Friday. Thanks.
Gathering
I'm sure we had a Gathering Activity, we always did, but for the life of me I can't remember what it was. Oh well. I do remember the drive being a bit of a hike and making a few wrong turns on the way.
Lunch and Story Time
When we arrived we were immediately impressed by the Gardens. We walked around a bit until we found a set of picnic tables behind the Horticulture Center where we were to meet our tour guide. Everyone had a packed lunchbox and water bottle. We had the girls eat while my co-leader read them chapter 5 in the Journey Book. It was about worm composting so that was apropos.
 |
| Chapter 5 |
 |
| Their picnic |
After lunch, we let the kids play in the garden until our tour guide arrived.
 |
| View of Horticulture Center from the back. |
Garden Program
We had a lovely woman, who was very good with with this age group, as a tour guide. First, she taught the girls all about worm composting and we made our own composting bin to take home. She then had a recycling game to help teach the girls about what to feed the worms and what to recycle. Finally, she took us on a long walk through the woods, around the pond, and over the grounds.
 |
| Garden and patio we worked in. |
Worm Composting
I'm far from a worm composting expert, but as I understand it, we made the simplest form of a compost bin. Considering I still have it, alive and functioning, in my garage a year later with minimal effort on my part I can definitely recommend this method. It's easily something you can do in the backyard, alone, or with your troop.
Supplies for composting:
1. A medium size plastic container with a lid and air holes drilled in about 2 inches from the top.
2. Red wiggler worms (earthworms from the backyard will not work.) You can order them from amazon or get them from a friend who composts.
3. Wet newspaper.
4. Organic material for food.
5. Dirt.
( This is where you would most likely get a whole lot more detail if this wasn't a year later, but I'll do my best. ) Our tour guide had the girls soak and wring out newspaper, then tear it into shreds to lay down a layer of bedding in the container. The container was placed under a table so the sun didn't dry it out.
 |
| Preparing the newspaper |
 |
| Looking in the "parent" worm bin in the shade |
Then our guide added dirt and the girls mixed it all up.
 |
| Adding dirt |
 |
| Mixing |
Then came handfuls of her already created compost from the "parent bin," along with the worms. We were surprised at how good all the girls were with handling the worms. It was pretty cool.
 |
| Each of the girls with a red wiggler |
 |
| Red wiggler worm |
After that, the girls added old veggies and another layer of bedding then we sealed the bin up and took it home. See the afterword for the wormery today.
Here's a good website that has more accurate info than me:
http://www.planetnatural.com/composting-101/vermicomposting/
Recycling game
I could tell our tour guide understood little girls by her next activity. She had two of the moms stand at the end of a long walkway in the garden, one carrying a recycling bin and one a "compost bin." On the other end was a pile of various toy foods and recyclables. The object of the game was for the girls to run the toys to the other end of the garden to sort the pile. There were some trick foods, like meats and things (plastic of course), that they were supposed to leave behind.


Walk around the grounds
The last thing we did was take a hike around the grounds. Our tour guide took us down a path, through the woods, around the pond, and through the flower gardens, talking to the girls about the various flowers and wildlife along the way.

 |
 |
| Creek in the woods |
 |
| Geese by the pond |
 |
| Turtles in the pond |
 |
| Goslings |
 |
| Pond |
 |
 |
| The final stretch back across the lawn to the Horticulture Center |
 |
| Enjoying the day |
Afterword: Worm Compost 14 months later.
These worms have lived on a shelf in my garage for 14 months. I'm amazed that they are still alive. I didn't touch them for almost three months in the middle of the winter (and it was a terrible winter), partially because of forgetfulness and partially because I didn't want to let the cold air in. I think they survived because the composting keeps it warmer in the bin and because without food they went into a kind of hibernation.
 |
| Wormery in my garage |
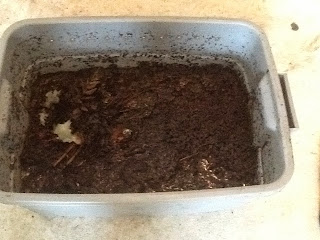 |
| Inside of the bin after 14 months |
As I'm writing this I'm inspired to actually harvest the worm casings for the first time. It was supposed to be done 6 months after the bin was started, but that would have been December and that wasn't happening. I did scoop out some castings and mix it with dirt in April when the troop was doing some planting, but didn't do a full harvest until now.
According to the directions I found on the website I listed, I pulled out the partially digested food and pushed the rest to one side.
 |
| Worms and casings to the left |
I poured out the liquid fertilizer "worm juice" into a bowl and used it to water my pumpkins.
 |
| "worm juice" that got poured on my pumpkins |
 |
| Worm |
 |
| Worm again |
Then I put new bedding and food on the clean side. I didn't have a lot of rotten veggies so most of the food I added was weeds from my flower beds.
 |
| Set up to lure the worms out of the casings to harvest easier |
Now back on the shelf for two weeks and hopefully all the worms will have moved to the clean side of the wormery.
Two weeks Later:
In the next two weeks, we added some strawberry tops and banana peals to the food side of the bin. When it was time to harvest it was looking pretty gross. Lots of worm casings. Neither of my kids would come near it. There's an unpleasant smell but it is very mild.
 |
| Bin after opening two weeks later (yuck!) |
I got out a pair of garden gloves and scooped out the casings, trying my best to keep as many worms as I could out of the fertilizer. I was shocked at how many worms there were. I'd say a minimum of 50, but there could have been as many as 100. I don't think we started with more than 10.
 |
| Harvested casings |
After I filled up a sand bucket (it took maybe ten minutes) I still had casings left in the bin but they were so packed with worms it was hard to separate any more out, so I just spread the remains back over the bottom of the bin and added more food.
 |
| Cleaned out bin, with worms and new food. |
Then came a nice thick layer of new "bedding" (aka wet newspaper). There was a good chance I wouldn't be doing much more with these little guys for the next month or more. And then the bin went back on the shelf in the garage.
 |
| New bedding |
The casings I brought to the backyard. After the big garden from last year we decided to plant a simple pumpkin patch, but we did have a few hitchhiker tomato plants grow on their own from last years squashed tomatoes.
 |
| Pumpkins and tomatoes ready for fertilizer |
The fertilizer would have probably done more good at planting, but it was too late so I packed it around the roots,
 |
| Fertilizer added |
then watered the garden.
 |
| "Before" Garden |
And done. For now. :)


