Monday, July 29, 2013

Daisy Scout Meeting Nine


Second week in  February 2013

 
Goal and Badges:        

Finish up earning the Orange Petal and begin working on the Purple Petal “Respect Myself and Others.”  Have a small Valentines Celebration.


* * * * * * *


Daisy Scout Meeting Feb 9

 
Arrival:               Gathering- Cut out Gloria leaves
                                                 Draw what you did with your Zinkies       

4:05                     Daisy Circle- Daisy Promise
                                           Present Zinkies and tell what did with them
                             Water team garden

4:15                     Snack and read Gloria’s story

                                                             What is respect?

4:30                     Charades

4:55                     Make Gloria or

                                                             Make smoothies

5:05                     Switch

5:15                     Final squeeze and hand out stuff

5:20                     Decorate Valentines bags

5:30                     Sit in kitchen to exchange valentines, share smoothie flavors and enjoy final treat.


* * * * * * *

Zinkie Outcomes:

The Zinkie Project was our Responsibility Project that we handed out at the end of the last meeting (see two blogs ago). I’m going to go ahead and share some of the stories of what happened with those poor little Zinkies.

Two days before our meeting, I got a frantic email from one of the moms. Her daughter had lost her Zinkie, maybe the dog had eaten it, and where could she buy another one? I called my co-leader so that we were on the same page on this only to find out her daughter had lost hers as well. My co-leader’s daughter had been playing with it the first night, her mom warned her that she was going to lose it if she didn’t put it away, but her daughter decided to play with it anyway and it was now missing.  My co-leader refused to help her find the Zinkie.

To the mom of the email, we asked her not to replace the Zinkie. We told her that her daughter wouldn’t be the only one who lost it and wouldn’t be made to feel bad about it, but part of the lesson was that it was the scout's responsibility and if she lost it then the consequence was that she didn’t have it any more. The mom seemed to accept this without a problem.

In the end, three of eight girls lost their Zinkie.

My daughter didn’t, but I’ll share her story and you can decide if it was cheating. My daughter was playing with her Zinkie, made her a paper house and paper food. When she was talking about keeping it safe so she didn't lose it I suggested she put it in her doll house which she did. Five days later, (on the day of the meeting) my then five year-old had completely forgotten this conversation and had no idea where the Zinkie was. I told her to look in the doll house where, low and behold, it was still resting.

So, I guess, I helped my daughter keep track of hers Zinkie. Really, it was a very hard project for a kindergartener (though two of the girls who lost it were first graders). I recommend doing it with a toy that’s a little bit bigger.

The turtle Zinkie is sitting on a quarter


Gathering Activities

Cut Out Leaves

A happy coincidence was that at our Valentines Day meeting we were also doing Gloria the Morning Glory, whose leaves are shaped like hearts. When the girls first came in they each had a pile of green squares and I showed them how to fold them in half and make them into heart-shaped leaves to use for later.

Close up of heart leaves on poster

Draw what you did with Zinkies

When and if they finished the leaves, the girls were given construction paper and encouraged to draw her Zinkie and what she did with them this week (even if they lost them).


Daisy Circle:

The Promise Leader led the Girl Scout Promise and then we went around the circle saying what Zinkie they had and what their name was. They showed their Zinkie or the picture they had drawn. The girls were encouraged to talk about how hard it was to keep track of their Zinkie, how they lost them or how they kept track of them.

Thankfully, none of the girls who lost them seemed ashamed or upset. They readily admitted that they lost them and how hard it was.


Snack and Story time

We passed out snack (heart shaped Rice Crispy Treats) and read the girls “A Surprise for Lily” the Gloria the Morning Glory Story which is about the flowers practicing good hygiene and self-care before going to a party and about  respecting their host by being polite and on time.
After the story, we talked about what “Respect” means.  I’ve found that most kids (even teenagers) can’t define respect.  It’s a term thrown at them often, but they don’t really understand it.  Unsurprisingly my girls couldn’t either.  Their closest answer was “it means being good.” 

My Co-lead and I defined respect for these girls as “doing things that show someone that you know they are important” and that self-respect was "doing things that show you know you are important by taking good care of yourself."

If someone has another good way of explaining it I’d love to hear, because I’ve been struggling with the definition for years.


Charades

We figured Charades would be a fun way to talk about the ways girls their age can respect themselves.  Then for extra fun we added a second round of things “not to do” when you respect yourself.


Respect “Dos” we used:
1.      Eat Healthy
2.      Brush Hair
3.      Go to Dentist
4.      Go to Doctor
5.      Be polite
6.      Do homework
7.      Take a bath
8.      Exercise

Respect “Don’ts”:
1.      Go out messy
2.      Burp
3.      Pick nose
4.      Eat Junk
5.      Be late
6.      Be mean
7.      Be lazy
8.      Refuse to go to bed

The girls took turns with the “dos” first.  (We left the “don’ts” as a surprise).  They were hesitant and shy at first, but by the third girl they were fighting for who got to go next.  The leaders helped by reading the slips to the younger girls and giving the girls ideas if they needed them.  The girls were a bit embarrassed to do the “don’ts,” but they were jumping up and down with excitement by the end.


Make Gloria the Morning Glory (1/2 girls at a time)

Gloria was perhaps the most complicated flower to make.  I had some premade pieces for the girls if they balked on the fancy cutting, but I was happily surprised at how well they did. 


Close-up of my Gloria

Full Picture of Gloria with her windy vine

Supplies
1.      Green Yarn
2.      Green construction paper
3.      White paper
4.      Scissors (one or each girl)
5.      Glue
6.      Purple tissue paper
7.      Googly eyes
8.      Red and/or pink sharpies

Pre-meeting Prep:
1.      Cut up green construction paper into various size squares and fold in half for leaves at Gathering.
2.      Cut long lengths of yarn.
3.      Cut 1” circles of white paper.
4.      Cut 2” circles out of the purple tissue paper and fold into 8 wedges.

Meeting Steps:
1.      Leaves as stated in Gathering.
2.      Pass around pictures of Morning Glories. Discuss how they are vines unlike the other flowers.  (And weeds as my co-leader insists. They’ll grow any where).

Morning Glories climbing a house

Close Up
Check out the heart shapes leaves

3.      Have each girl glue a windy path for the vine then glue on the yarn.
4.      Pass out the pieces of tissue paper and while the girls are gluing the vine go to each girl and help them cut the tissue paper (it’s kinda like cutting out snowflakes).  There are 4 small cuts: two angular at the tip making it a sharper tip and two cutting off the top two corners.

Tissue paper already cut and white paper showing lines to cut

5.     Once all the girls have cut their flowers they can glue the white circle at the top of the vine.  Then unfold the flower and glue it on top.
6.      Glue on eyes and rest of leaves.
7.      Wait until the last possible moment to draw on mouth since it will probably be wet with glue (or cut out mouths instead).

One of the girl's Glorias.  Pretty good, eh?
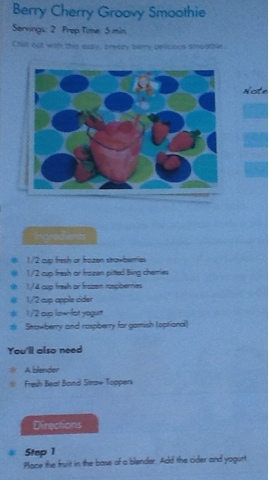


Make Smoothies

In the Gloria story the Flowers make smoothies as a healthy breakfast.  We thought making smoothies would be a fun activity and way to talk about respecting yourself by treating yourself to healthy snacks.

Exerpt from story

The girls really enjoyed taking turns putting in the ingredients and pressing the buttons.  At the end my co-leader made a big show of all the girls putting one hand on the top of the blender to keep the lid on.  It was a very cute bonding thing.

The recipes we used were the NickJr Fresh Beat Band Recipes.  The girls found them a bit tart for their taste, especially the berry one.  We used frozen fruit except for the bananas and that smoothie was the far yummier.  I’d recommend using vanilla instead of plain yogurt and as much fresh fruit as you can find. 


Mini Valentines Day Party

We extended this meeting by 20 minutes so the girls could have a little Valentines Party at the end.  All the girls had brought Valentines for each other.  We laid out red paper lunch bags (cheap at Target, already had them in the house) and a ton of Valentines Day stickers and markers.  Then we let them decorate the bags.

We had a lot of plans for organized delivery of valentines, but in the end it was just a free for all with the girls exchanging valentines (not unlike SWAPs at camp I now know) and putting them in each other's bag.

At the end, we had Valentines Day cupcakes (baked enthusiastically by my daughter) and fun was had by all.


Homework/Handouts:

The girls went home with their Gloria worksheet, permission slip for next weeks Tae Kwon Do Field trip, their valentines, and their orange petal.


Thursday, July 11, 2013

Interlude: SWAPS and Sit-Upons


Alternate Title: Girl Scout Camp prep for the OCD Newbie

I’m taking a short break from my timeline (which is very difficult for my OCD by the way) to share our experiences preparing for Girl Scout camp for the first time while it’s still actually summer.   

Six of my eight girls were going to the same camp this year as well as one of the two girls joining the troop in the fall.  My husband was volunteering and my four year-old son and his friend going as tag-a-longs.  The camp started exactly a week after we got back from vacation and for that week I lived and breathed camp prep.  I went total Obsessed Crazy, with a capital “C”.  I’m still sad I couldn’t volunteer myself except for Friday (couldn’t get off work).

 The Friday before camp started we had a SWAPS/Sit-Upon making party for the girls going.  What follows is the two projects we did that day, then the SWAPs I made for my husband to hand out as the Fishing Instructor (which is funny because he doesn’t fish) and the very quick SWAP I made for my son so he wouldn’t feel left out on Friday.

The Itinerary for the party was:

  Gathering-Prep SWAPs

  Eat Pizza

  Finish prepping SWAPs

  Make Sit-Upons

  Make SWAPS

Note:  In case you’re a real newbie.  A Sit-Upon is something the girls bring with them to sit on so they don’t have to sit on the ground and a SWAP is a small something attached to a pin that the girls trade the last day of camp.
Official meaning of SWAPS

Sit-Upons

Supplies for 10 Sit-Upons

  1. 2 Vinyl 50x70 Tablecloths
  2. Roll of gimp (plastic lacing)
  3. Packing foam
  4. Elmer’s type glue or fabric  glue
  5. Heavy-duty hole punch
  6. Straight pins
  7. Sewing machine (for straps)

Pre-meeting prep:
(For Daisy Scouts.  Older Girls could do some or all of this on their own).

  1. Cut one tablecloth into twelve 20” squares and one into eight 20” squares. The extra fabric is for the straps.  (You could make 12 sit-ups if you left out the straps)
  2. Match up squares back to back (we used two different tablecloths so 8 had different patterns on each side) and pin in place
  3. Punch holes about every inch.  (You need a good hole-punch for this or the process is torture.)
  4. First step.  Holes should be a little closer together.
     
  5. Cut out packing foam sheets to fit inside.  Ours were thin and we used three sheets each.  (This is what we found in the house.  If you don’t have these be creative with your own stuffing or use newspaper).
    Packing foam
  6. Glue in the foam, just enough to keep it from bunching up.
  7. Pin back together
    Ready for the girls.
  8. Cut 10 strips out of left over fabric, at least 4”x 24.”  Sew together a long, inside-out tube with sewing machine.
  9. Reverse straps. 

Meeting

  1. Allow girls to chose their lacing (if you have more then one color) and cut off longest piece they can manage. 
  2. Caution to be careful of pins and help girls triple knot gimp to the vinyl.
  3. Start Lacing.  We sat around a circle and once they had gotten the hang of the sewing, to keep their attention, we started a singing game.  They were so into the game that before we knew it the sewing was done and we were knotting the gimp (triple knot).

Straps

We planned to punch more holes and have the girls attach the straps themselves, but were running out of time.  We sent the Sit-Upons home with the straps and told the moms to attach them diagonally.

 I attached my daughters and several of the others myself.  I did this using the sewing machine, inserting the strap in between layers at the corner where the knots were tied and the then sewing over the gimp along the corner with a zigzag stitch to secure the gimp.  Then I repeated this on the opposite (diagonally) side.
 
Attached Strap.

 
Finished Sit-Upon, worn over the shoulder


A My Name is Alice Game

The game we played that had the girls so engrossed was “A My Name is Alice,” a game I played as a kid with clapping or ball bouncing.  Goes like this:

 A my name is Alice and my boyfriend’s name in Andy and we come from Alabama and we eat Apples.

Then the next person goes replacing the “A” words with “B” words.  Since my girls are young and would have had trouble being put on the spot we did this collaboratively.  I asked them to call out ideas for say “B” girl names, boy names, places and foods.  Then I picked the funniest ones and said it all together.  We got to K I think. For example a funny one they came up with:

 J my name is Jenny (a girl in our troop) and my boyfriends name is Jake and we come from Jail and we eat Jellybeans.

Had the girls laughing and engaged the whole time.  I’m using this when ever we’re waiting for anything.


“Lets go to the Movies”  SWAPs
 
Finished SWAPs

 The theme of this camp was “Hollywood,” in case you’re wondering.  

Supplies

  1. Safety Pins
  2. 2”X2” zip lock bags (can get on Amazon)
  3. Scotch tape
  4. Labels stating “Lets go to the Movies”
  5. Popped popcorn
  6. A roll of yellow or gold tickets
  7. Movie theater candy that won’t melt ‘cause summer camp is HOT.  (We used Sour Patch Kids and Skittles).
  8. Gold Star confetti
  9. Movie shapes from card stock (I used Cricut and the “Movie Night on-line Cartridge”)
***And if you want to make your shapes super fancy…glitter, glue, sharpies, and white out.***

Pre-meeting prep:

  1. Make labels (I got three columns across on word) and cut them out.  Two inches across fits the baggies perfectly.
  2. Cut out shapes (or go buy stickers if you don’t have a Cricut or a thousand hours)

I made:  Gold 3D glasses, gray movie cameras, black movie clipboards (all from Movie Night cartridge) and red and blue slurpies (our favorite movie treat) (from elongating the basic cupcake pattern on Cricut.)

Cricut Cartridge

  1. Make samples, one per girl, to send home.


Gathering
(This is the crazy OCD version that we came up with so the girls could be more creative and excited about the SWAPs.  You could just have the girls write their name and troop number on the back of the labels)

I had set up six stations around a table for my six girls to rotate through.  Once all the girls arrived, they rotated stations every five minutes or so.  We had a paper plate for each girl to carry her creations from station to station.

Station 1: Write name on the top half of the back of as many labels as they could.

Station 2:  Decorate Slushies- Markers to draw on a cup and glue and glitter to make top.

Station 3:  Decorate 3D glasses- option of drawing on black plastic with marker or gluing on black stars.

Station 4:  Write Troop number on bottom half of back of label.

Station 5:  Decorate Camera- with gold stars, confetti, glue and markers.

Station 6:  Decorate Clip board – white-out, gold and silver stars, and glue.


Sample pieces
 
Later in Meeting
We had laid out on table plastic bags, candy, popcorn, and extra shapes.  The girls were told to put four different items in each bag (mixing and matching made it more interesting) and make at least 30.  They all ended up with between 40 and 50.  Though to be fair, my most competitive kid (she’s a machine, man) did 71 and then gave her extras to some of the girls who had less.

They were each sent home with their stuffed bags, 50 safety pins, 50 yellow tickets, and 50 labels, including the ones they had already written their name on (guess which girl had done 51) and a sample.

After Meeting (for mom and girl to do together)

  1. Have girl finish names and troop number.
  2. Tape label onto top of bag.
  3. Pin ticket onto to each bag.

My daughter did a little of the taping and pinning, but I mostly did that while she was finishing up her writing. (She’s six).  Took maybe 30 minutes while watching a show on the Disney Channel.

More made by my daughter

Starfish SWAPS
These are the SWAPS that I so graciously made for my husband to give out on SWAPs day.  They are modeled after a lot of the fishing SWAPs I’ve seen on Pinterest, but instead of a fish it’s a star they catch cause it’s Hollywood camp, get it?  I know so funny, right?
 
Supplies
  1. Safety Pins
  2. “2X2” zip lock bags (can get on Amazon)
  3. Labels stating “Catch a Star {clip-art of fish}”
  4. Paper or foam stars (again I used Cricut)
  5. Twine  (I used old crochet twine)
  6. Thick, but sharp needle (I used two: a small sharp needle and a blunt beading needle)
  7. Fine-point red and blue markers
  8. Toothpicks
  9. Glue
In various stages
Steps
  1. Print out labels on plain white paper and cut.
  2. Make your husband write his camp nickname on the back of all the labels until he’s ready to kill you.
  3. Cut out star shapes and punch out if using Cricut.
  4. Draw faces on each star (I would have used googly eyes if I hadn’t needed to make so many).
  5. Using needles, punch a hole on the top of each star.
  6. Cut off sharp edges of tooth picks.  I did 6 at a time with regular scissors.  Surprisingly easy.
  7. Cut 3 inch lengths of twine.
  8. Thread twine through star and tie.  Tie other end to toothpick.
  9. If you’re OCD, glue the twine to the end of the toothpick so it doesn’t slip.
  10. After glue dries, stuff the baggies.
  11. Pin label to top.

Finished SWAPS
 
 
“See you in Hollywood” SWAPs
Aka: SWAPs for the little brothers attending camp as tagalongs.
Note:  My 4 year-old son hates crafts with a fiery passion.  I think it’s a direct response to how much my daughter loves them.  All I asked him to do for these is pick out which foam stickers he wanted to use.
 
Supplies
  1. Safety Pins
  2. Labels stating “See you in Hollywood!"
  3. Masculine colored ribbon
  4. Foam stickers of various modes of transportation (We had a huge bag left over from birthday parties that we got from Oriental Trading)
  5. Tiny Googly eyes
  6. Glue
 
Steps
  1. Print out labels on plain white paper and cut.
  2. Write name of child and year on back of labels
  3. Cut 1"-2" lengths of ribbon
  4. Peal back sticker backs and place in ribbon end.  Place sticker back back in place.
  5. Pin label to top of ribbon.
  6. Glue on Googly eyes for fun. 
Boy SWAPS


After Notes:   I'm posting this after the last day of camp and my one exhausting day volunteering.  The girls loved it.  SWAPS went fabulously and he girls only complaint was that they ran out.  My husband was miserable about handing his out so I took his fishing hat and took over.  My four year old was surprisingly into SWAPing and his SWAPS were a hit.  The other little boys didnt have SWAPS and were kinda bummed.  The sit-upon s were neglected most of the week, but it rained today and they were lad of the protection from the mud.

Another camp in 3 weeks.  Stay tuned.

Sunday, July 7, 2013

Daisy Scout Meeting Eight

First week in February 2013

Goal and Badges:        

Begin working on Orange "Responsible for Myself and Others" Petal.  


* * * * * * *

Arrival:   Gathering- Paint Petals
       Paint Bags

4:15                      Daisy Circle- Daisy Promise
‘Round the Daisy Circle with favorite part of field trip
               Water team garden

4:30                      Snack and read Mari’s story/explain piggies

4:45                      Popcorn/promise game
                           
5:00                      Make Mari/
                              Make poster daisies

5:10                      Switch

5:20                      Final Daisy Song in Circle
                              Friendship squeeze
                              Hand out Zinkies
                              Be responsible for worksheets (grab folders)


* * * * * * *

Gathering Activities

Mari Petals
My Mari was one of the flowers that required painting and we always tried to add the painting part to the Gathering so the pieces would be dry enough to work with by the time we worked on the flower. If you're going to try it that way I would recommend always giving the girls paper plates with their names on them so you can tell the flower pieces apart without the girls needing to write on all the little pieces (and ruin them).

I'll put the instructions for Mari all together down further in the blog.


Team bags
As part of this petal we decided we wanted the girls to become more responsible for their stuff at meetings and their handouts (Instead of the chaos that often happened at the end of meeting with moms and dads scrambling to find everything they need.)


We decided to have the girls make their own tote bag and folder then make it routine to get it at the end of the meeting to put their things in. The folders they had made at the end of the last meeting. For the bags, I found a kit from Oriental Trading that included 12 plain linen cream-colored bags, just big enough to fit a binder in, a set of fabric markers, 4 sets of fabric paint pens and foam letters. Oriental trading link.

We saved the foam letters for a different project since neither of us leaders had faith they would stay on the bags. Before the meeting, I used the markers to write the girl's name and the troop number on one side then we laid the bags out so they could decorate the other side any way they wanted. Because of the amount of time it takes for fabric paint to dry they could only decorate one side. Also, I wrote the girls names because I wanted to make sure it was legible (We still had quite a few 5 year olds at this point)

My Daughter's finished bag

Daisy Circle:

The Promise Leader led the Promise and then we went around the circle saying what they liked best about the last field trip.  Then we watered the team garden.


Snack and Story time

After handing out snacks we read the Mari story and talked about what being responsible meant.


Piggy Bank Pledge

This was mostly a take home project.  Basically, we explained to the girls that they were taking home their piggy banks and a list of chores and they were to talk to their parents about what they would take responsibility for in their household over the next couple of months.  From this they would earn money for their piggy bank and bring it in at the end of the spring when we were doing "Make the World a Better Place" and the money would be donated to the charity of their choice.  My girls wanted to donate it to an animal shelter.


Popcorn Promise Game
For this game we used a parachute and bunch of light balls (the kind you use in a ball pit). The inspiration came from the girls always asking to play "popcorn" with our parachute. This is where you put all the balls in the middle and everyone takes a piece of the parachute and shakes vigorously making the "popcorn" pop like mad.

This creates a huge mess and my kids never want to pick up all the balls. So for this game the girls got to play popcorn, but after they had to make a "promise" to get a certain number of a certain color balls and bring them back to the bag. Then they had make good on their promise. Repeat until the room is cleaned. One or two girls whined that it was just cleaning up but the room was clean in no time. Overall, they enjoyed it and we burned up a little energy.

 
Parachute and balls for game


Make Mari the Marigold (half of the girls at a time)

For this one I used orange construction paper instead of cardstock.  I was hoping the paper would dry crinkly on the edges to look like marigolds.  Didn't work out that way, but I still think construction paper is a better effect.


My Mari


Supplies:
1.  Real Pictures of marigolds
2.  Orange construction paper
3.  Marigold template into three different sized flowers


Template for flowers


4.  Yellow paint
5.  Dixie cups
6.  Green cardstock or construction paper 
7.  Scalloped scissors
8.  Green pipe cleaners, 2 per girl, cut
9.  Glue
10.  Stapler
11.  Googly eyes
12.  Red and/or pink sharpies
13.  Small paper plates


Steps:
Pre-meeting
1.  Cut out at least three marigolds per girl in 3 different sizes
2.  Cut out leaves. Take a piece of green paper and cut into three long strips (different widths) then use a scalloped scissor to cut dozens of crescent shapes.  This should be fast and organic so they don't have to look exactly the same.
3.  Cut Pipe-cleaners.  Each girl should have, approximately, one pipe cleaner cut into 2/3 and 1/3 pieces and one cut into 1/3 lengths. (5 pieces total)
4.  Cut down 1-2 Dixie cups and add 1/3 yellow paint to 2/3 water and mix 

 
Watered down paint


Gathering
1.  Each girl gets a paper plate with their name on it and 3 different sized flowers.
2.  Dip the petals in thinned yellow paint to coat just the edges.
3.  Place them back on plates and set aside to dry.

Later in meeting
1.  Pass around pictures of real marigolds.


2.  Girls glue, then adults staple stems
3.  Glue on flowers largest to smallest
4.  Glue on leaves
5.  Glue on eyes
6.  Draw on mouth

One of the girl's Maris.  (Dot on forehead is a ladybug sequin we had added later).


Make Poster Daisies for Booth Sales (half of the girls at a time)

Remember the disastrous attempt at cookie posters a few posts back?  The one where we let the girls decorate as they wanted to and the posters were a mess and there was no way anyone could read them from the street? Well, they were just not going to work.

However, we didn't want the posters to look like they were made by OCD moms and not the girls, so we came up with this idea.  We had each girl create two flowers: one with copied words or a phrase about something we want to use our money on and one with a drawing of something they love about girl scouts.  We then pasted the flowers on daisy blue poster-board and used the left over foam stickers from the bags to tie it all together.


Supplies
1.  Poster board (we needed 2 for 8 girls)
2.  Flower Template

3.  Construction paper in various colors
4.  Glue sticks
5.  Colored pencils
6.  Sharpies
7.  Foam or/and paper letters
 
Steps
Pre-meeting Prep
1.  Cut out enough flowers from construction paper.
2.  Decide what the troop wants to use the money on (from previous discussions) and write enough for each girl on small pieces of paper for them to pull from a hat.

At Meeting
1.  Distribute one flower per girl and let them pick a phrase from the hat (examples:"Field Trips", "Journey books," "help the animals," "craft supplies," etc).
2.  Have them copy the phrase in sharpie on one flower.
3.  Distribute second flower, let the girls draw whatever they love about daisy scouts on that one.

After meeting
1.  Glue on flowers.
2.  Write "Buy Cookies" or some such in premade letters and let your own daughter stick them down.

Finished Posters


Closing Circle: 

This closing circle was a little more complicated than most.  After the friendship squeeze, we had the girls go get their folders (the bags weren't dry yet) and sit back in the circle.  We explained to them that from now on they were responsible for getting their bags and folders and putting their things inside.  We gave out their patches from last time (the leaves and bank patch) and the Marigold handout.  Then we gave them the Piggy instructions and reminded them to bring home their piggy bank.

Last we had them calm down (for some reason my girls are always excited and wound up at this point) and explained to them their final Responsibility project: the Zinkie Project.

Zinkie Project

Zinkies are itty bitty little plastic animals that come in plastic bubbles.  I happened to have an extra set left over from Christmas.  If you do this, I recommend using the Squinkies which are still small but not quite so itty bitty. 

We handed out Zinkies attached to cards and told the girls that their Zinkie was their responsibility until the next meeting.  They were to name the Zinkie and promise to take care of it.

There was one objective:  Don't loose your Zinkie!  Nothing else was required.  All they needed to do was bring it back to the next meeting.  Moms were told that this was the objective, but they were also instructed not to hide the Zinkie and to let the girls take charge.  It was an interesting experiment.  (Outcome in next blog, to come out when I get a break from Girl Scout camp craziness).


Zinkies and Zinkie Cards.  Purple Squinkie on left for comparison.


Homework/Handouts:
  
Mari Handout

Handout explaining projects to mothers.

Note on Cookie Sales:

At this point we were pretty heavily into cookie sales behind the scenes, but the idea of getting into it feels overwhelming and, also, there are so many more awesome cookie moms out their with great blogs.  We did our best but it was our first year.  Unlike Journeys, cookie sales have been going on for generations. 

Point of this ramble ... I think I'll do a single post with all our behind the scenes cookie dealings later in the timeline.  It might not be sage wisdom, but hopefully it will be interesting to other newbies.