This wasn’t a troop thing, but my daughter and my co-leaders daughter's went to another Girl Scout Day Camp, Camp Gingerbread, and we made some pretty cool SWAPS (if I do say so myself). I thought I’d share. My Co-leader and I also volunteered there and I threw together some spicy-sweet smelling last minute SWAPS for us too.
Pony Bead- Lollypop SWAPS

These were a collaborative effort between my co-leader and Myself after we saw the melted pony beads on Pinterest. We experimented separately and then got our two girls (6&7) together to make a batch of SWAPS. To be fair there were only two steps girls of that age could even do, so if you want a SWAP for Daisies or Brownies that they can do mostly themselves, I’d save this one until they’re older.
Supplies
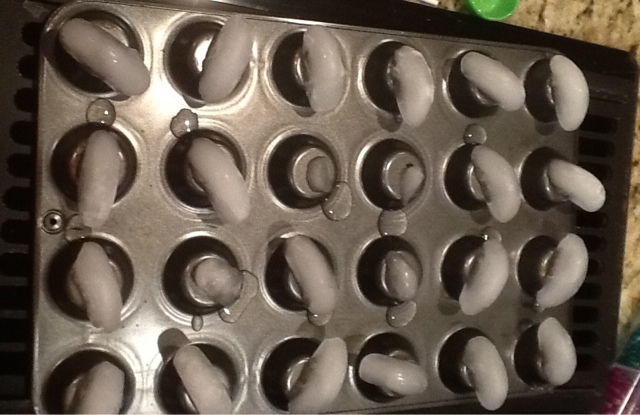
1. Mini muffin pans (the more muffin cups the better, the smaller the cups the better).
2. Pony beads in a variety of colors; clear, pearl and opaque
3. Lollypop sticks (you can buy them by the hundreds at Michaels)
4. Heavy duty kitchen scissors or plant clippers
5. Hot glue gun
6. Ribbon
7. Safety pins
8. Labels (Kids first name, year, camp name, cute saying, whatever...)
9. Pointy, not great quality scissors
Steps
1. Preheat the oven to 400F
2. Have your girls combine colors and put pony beads into the bottom of the muffin cups, just enough to cover the bottom. 2-3 colors and different types (clear, opaque, pearl) usually look best, but let the girls be creative.
 |
| Beads ready to go in oven |
3. Put the beads in the oven for 15-20 minutes until they are completely melted. (Open the windows as it does emit fumes. It didn’t bother me but I think it would be a problem in a closed in kitchen).
4. Once completely melted, pull them out just enough to swirl the beads with a pointy scissor or knife. (We tried a toothpick … eh no). By the third, it generally starts to stick, so I had a pile on the semi-sharp kids scissors we use at meetings and changed scissors after two swirls. By the time you get the the sixth one, the disks have generally started to harden, so we put them back in the oven for 5 minutes and repeated the process until all the cups are swirled.
 |
| The ones on the bottom right have just been swirled. |
 |
| Pull off any stuck on plastic immediately or your scissors will end up like these. I had to stick these in the oven for 5 minutes to get it off. |
5. After the last cup is swirled, put back into the oven until all the beads are completely smooth.
6. The best way to get the melted disks out of the pan is to cool them down fast. As soon as the pan is able to handle with your bare hands you can either a) pop the entire pan into the freezer for 5 minutes or b) place ice on top of the cups.
 |
| The ice method of removing disks |
7. Once cool you should be able to firmly press down on the edge of a disk with a spoon or scissors and it should just pop out.
8. Cut lollipop sticks into halves or thirds (depending on the size of your muffin tins) with the heavy duty scissors. I didn’t have kitchens sheers so I used the clippers for my rose bushes. Worked like a dream.
9. Hot glue sticks to back of disks(this is the other part that my daughter helped with. We started with me putting on the glue and her sticking on the the sticks. Then she wanted to try the gun. We went over safety and she took over and did great!!
 |
| Little hands applying sticks |
10. Tie small pieces of ribbon around the lollipops and secure tie with hot glue. (My 6 year old couldn't tie well enough to do more than a few of these, an older girl could probably do this step on her own.)
11. Pin labels onto back of swap.
 |
| Where to pin |
12. TADA!! Finished SWAP!
 |
Cinnamon Gingerbread Man SWAP
These are the SWAPs I made for my co-leader and myself as camp volunteers. Since it was Gingerbread Camp I desperately wanted to try cinnamon ornaments as gingerbread men (I’d never made them before). Then I had the brilliant idea to bring it up a notch by melting a pony bead button in the center to add some color.
Of course, as my husband later made fun of , I had neglected to take oven temperatures into account. The cinnamon ornaments bake at 200F and I’ve discovered the beads need s minimum of 325-350F. I also discovered that the cinnamon ornaments burn at that temperature. But I was full on obsessed and refused to give up until I achieved my “vision” as my co-lead mockingly calls it, even though it was Thursday night at 8pm and we had to leave for the final day of camp the next morning at 7am.
But never fear, we found the solution. An iron!
 |
| Finished SWAPs. Picture taken at camp. |
Supplies
1. 1 Cup Applesauce
2. 1 1/2 Cup Cinnamon
3. 2 Tbls Ground Cloves
4. 1 1\2-2” Gingerbread Man cookie cutter
5. Rolling pin
6. Wax paper
7. Parchment paper
8. Cookie Sheets
9. Pony beads
10. Iron
11. Tooth pick
12. Red embroidery twine
13. Safety pins
14. Labels


Steps
1. For detailed instructions on how to make cinnamon-applesauce dough see the website I stole it from:
Cinnamon Ornament tutorial Basically, stir together a cup each of cinnamon and applesauce. When mixed well add the ground cloves and additional cinnamon. Knead with hands until completely mixed and a firm dough.
2. Roll out dough to 1/4" thickness. Use cinnamon instead of flour to prevent sticking. I prefer to roll out doigh between two sheets of wax paper. It's easier to peal back the wax paper than to deal with it sticking to the table or rolling pin and it 's less mess.
3. Preheat oven to 250F if using pony beads, 200 if not.
4. Cut out gingerbread men. You should be able to get 60-70.
5. Transfer to parchment paper lined cookie sheets and press a pony bead into the belly of each "cookie."
 |
| Unbaked Gingerbread Men with holes in their head |
6. Using tooth pick make a hole in the head to add string later.
7. Bake at 250F for about an hour. Gingerbread men should be rock hard but not burnt. Pony beads will only melt enough to attach to base.
 |
| Right out of the oven |
8. Once cool move ornaments to ironing board. Place a small piece of parchment paper on top of gingerbread man and using a iron heated to high melt the bread into a flat button. At the beginning, I carefully stood and ironed each. By the end (the next morning), I just laid the iron on top of the ornament for about 2 minutes while I did other things (i.e. I frantically ran around getting ready for camp). Safety first, so be careful with that method around the kids.


9. Thread twine through hole you created and tie off.
10. Thread another color bead over knot.
11. Secure safty pin and label in loop, keeping bead in place.
12. Cut twine to even and Done!
 |
| Finished product |
No comments:
Post a Comment