Monday, August 11, 2014

SWAPs Interlude VI


These two SWAPs are some of our favorites.  My seven year-old used both of these at her "Myths and Legends" camp.  She had two different SWAPs because a) I had SWAP fever at this point, b) the first one was too expensive to make more than 24, and c) my daughter gets bored after a dozen of anything.  The second SWAP was inspired by her unit name "Thumbelina" and made entirely out of supplies I already had in the house, whereas the first we had conceived weeks earlier in a binge while the two of us walked through Micheals Craft Store.


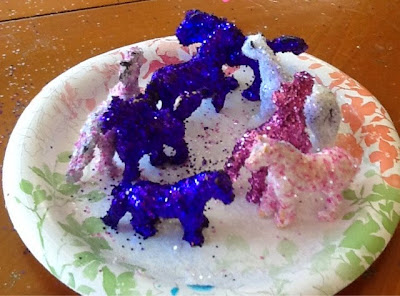
Pegasus SWAP

This was inspired by the camp theme "Myths and Legends" and some glittered Christmas deer I found on the pinterest.  My daughter jumped on the idea with enthusiasm and her attention span lasted longer with these SWAPs than any other we've made.  And why wouldn't they?   Glue, paint, glitter, hot glue and feathers.  A little girls dream.  Depending on how cheap you find the horses and the glitter it can be on the pricier side, which is why we only made 24, but they are pretty cool.


Supplies
1.  Small plastic hobby horses (the ones I got were 12 for $10 at Michael's, 40% off with coupon).
2.  Elmer's type glue
3.  Tempera paint and paint brushes
4.  Glitter
5.  Small decorative feathers
6.  Glue gun
7.  Paper plates


Starting supplies

Steps:

1.  Mix equal parts glue and tempera paint.


2. Paint to fully cover toy horse.


3.  Sprinkle on glitter thickly.  I Recommend lying it in the glitter once you've got a nice pile and really coating it with glitter.


4.  Let dry several hours or overnight.


5.  Find pairs of tiny feathers, trim as needed.


6.  Hot glue feathers on with a low heat gun.


Yes, that's my 7 year-old with the glue gun.  She is excellent with it and really enjoys using it.  I definitely think girls this age can use them safely.   They just need to be closely supervised the first few times. (And only use low-heat guns.  Seriously, throw out the old ones, they can be dangerous.)


Finished Pegasus'
8.  My daughter, originally,  decided she didn't want a pin and tag on these.  Most kids don't pin on their SWAPs in our area anyway.  Then, the day before camp started, while I was making the SWAPs for the adults, it was somehow decided that these needed tags too.  So....

We printed out these simple tags.  I learned this clever folding technique from the Aids in my last camp.
Tag

9.  Then I tied a thin ribbon around the horses neck and secured it with hot glue before my daughter pinned on the tag.  I tried pinning it straight to the wings but it didn't work.  I used old ribbon that is around the house, but the really thin ones work best.


Thumbelina SWAP

We found out my daughters unit name for "Myths and Legends" Camp was "Thumbelina" after we made the Pegasus'.  Since the pegasuses were so expensive and you can easily swap 50 SWAPs at this camp we decided to make a Thumbelina one as well.  

After doing this I fully recommend making two different SWAPs, much better for the attention span.  50 of the same thing is a lot.  For this SWAP we used only things we already had in the house (though I was very tempted to go out and buy wooden beads for the head).  It helped defray the costs of the horses.


Supplies
1. Pipe-cleaners (flesh colored optional)
2. Cheap fake flowers, deconstructed
3.  Pony beads 
4.  Yarn
5.  Hot glue gun
6.  Safety pins
7.  Tags

Steps
1. Cut the pipe-cleaner to twice the length of your thumb and fold it in half.


2.  Thread on bead and twist 3 times.


3.  Cut shorter piece of pipe-cleaner for arms.


4.  Twist on arms.


5.  Thread on two beads for shirt.


6.  Add fake flower skirt and widen legs to secure. A dot of hot glue underneith also helps.


7.  Draw face on bead with sharpies.


8.  Add yarn hair with glue gun.  We braided some for variety.


9.  Add fake flower hat with glue gun.


Flowers we used.  Top two became hats and hair.  The skirts were from deconstructed flower leis.


1o.  Pin tag onto skirt.


11.  My daughter used my rejected shrinky dink swap as a "handbag."


And Done!


Monday, August 4, 2014

SWAPs Interlude V

These next two SWAPs weren't actually girl made, though they certainly could be.  The first set were my SWAPs to give out to my unit when I volunteered at camp.   The unit name was the "Forest Fairies" and my camp nickname is Shrinky Dink.   The second SWAP was something I made with my five year-old son (let's face it was mostly me, though my daughter helped) for "Myths and Legends" camp so he would have a few to swap if he wanted to and wouldn't feel left out.


Shrinky Dink Fairy SWAP

My camp nickname has been Shrinky Dink since last year and I knew as soon as I volunteered for the week I wanted to do a shrinky dink SWAP.  I found the shrinky dink paper and thought it would be fairly simple.  I was wrong.

The original plan was to print fairy pictures onto the paper, cut them out and make charms.  Easy-peasy, right?  Well, it turns out you need specialized shrink paper to print using an inkjet, otherwise it smears and runs and makes a mess.  My poor daughter was helping and almost wound up in tears when she accidentally smudged half a page as she tried to cut out the pictures for me.  I read sanding the paper would help.  It didn't.   I was able to get a few really nice ones by printing them, quickly sprinkling them with embossing sand, letting them dry overnight, then baking them.  But even then, less then half turned out nice (the ink starts to bead right out of the printer) wasting the printer ink, the shrink paper, and the embossing sand.  None of which are cheap.

The few printed ones that worked

The majority looked like this.

My daughter recycled, using the duds as purses for her SWAPS

The instructions that came with the shrink paper recommended using stamps and/or permanent ink markers, so this SWAP was born and, hopefully, you can learn from my mistakes.  The stamp ink can smear (though not nearly as badly) so you need to blot carefully and give it time to dry between steps.   Sharpies work great with very little smudge potential.  My daughter did try colored pencils but that didn't work all.

This would be a very fun project for girls as young as Brownies.  The only problem is they have to be very careful not to smudge and there is drying time between steps.


Final SWAP


Supplies
1.  White shrink paper
2.  Sandpaper block
3.  Fairy stamps (I have the Melissa and Doug Fairy Set)
4.  Ink pads
5.  Sharpies
6.  Scissors and holes punch (mine was flower shaped)
7.  Artist's safety pins
8.  Beads

Stamp set on Amazon


Stamps and ink pads


Sanding block I use


Artist Safety Pins from Oriental Trading


Metallic pony beads that I used from Oriental Trading.  

Steps
1.   Sand the shrink paper.  Very important to prevent smudging if you have glossy paper.

2.   Measure the width of your stamps and cut into strips (this prevents smudging from leaning on adjacent images when coloring them in.)


3.  Stamp a row.


4.  Carefully blot the row on a piece of scrap paper.


5.  Once done stamping let dry for several hours or overnight.

6.  Color in stamps with sharpies and let dry for at least an hour.


7.  Carefully blot again.

8.  Cut out shapes and punch a hole in corner.

9.  Write date and/or name on back with sharpie and let dry at least an hour.


10.  Preheat oven to 325.

11.  Place pieces on baking sheet, word side down.  The sharpie is less likely to come off on the pan.  I use a sheet of parchment paper to protect my cookie pan.


12.  Bake for 2-5 minutes, until all pieces lie flat.


13.  Cool for about ten minutes.


14.  Place Shrinky Dink Charm and bead on safety pin.  I used "artistic safety pins" from Oriental Trading, but regular large safety pins will work.  


Finished SWAPS.  (They are actually much more detailed in person.)

I also made myself a Shrinky Dink Necklace to wear at camp.  Fairies on one side of the shrinky dink and letters spelling out "Shrinky Dink" on the other.


Shooting Star SWAP

For those of you not familiar with Girl Scout Day Camps, they are 100% volunteer run.  Because of this they have units for the boys and preschool children of the volunteers. (Also volunteers' kids are usually free or close to free.  A great deal if you have a lot of kids).  

My five year-old son attended two camps this summer, one my husband volunteered at and one I volunteered at.   Sometimes, they mingle with girls at swap time and sometimes they don't, but I wanted him to have a few just in case.  I sent him with 15.  My daughter generally goes with 30-50.  She once went with 70 and came home with 20, so too many.

I chose these little stars because even my craft hating son likes to melt pony beads and all he had to do is throw beads in the mold and watch them melt.  Stars for a "Myths and Legends" camp is a bit of a stretch but all the constellations are based on myths and written in the stars, right?


Supplies
1.  Silicon star molds
2.  Pony beads of different colors and types (translucent, opaque, pearl etc.)
3.  Scissors 
4.  Oven
5.  Gold card stock with message
6.  Glue gun
7.  Safety pins (gold if available)

Steps
1.  Mix three different types/colors of beads on the bottom of the molds so they are just covering the bottom.  (If the kids throw in more that's fine too).


2.  Preheat the oven to 425.  You may want to bake it in the toaster oven outside.  We did the first batch inside, but the fumes from the beads kept setting off the fire alarms.


3.  Bake for 15-20 minutes until just melted.


4.  Using a pointed scissor, swirl the star.  You will only be able to swirl two before the scissor heats up and sticks to the beads.  I recommend either having multiple scissors handy or doing them in batches.


5.  Bake another 5 minutes or until smooth. (In you are swirling in batches bake 5 minutes in between).  


6.  Allow to cool (about 10 minutes) and the stars should pop right out.


7.  Print message on gold cardstock and cut out to make a shooting star trail.


8.  Glue gun tag to back of star and add a safety pin.


9. Done!